First 10 Things to do immediately after you install WordPress
 WordPress comes as a plug-and-play option for blogs and websites. While for normal websites you have to arrange your content, add pages and other stuff, on a blog you can just start blogging about whatever subject you want. Let’s assume that you already have a theme and you installed it, what you do now.
1. Change the permalinks structure
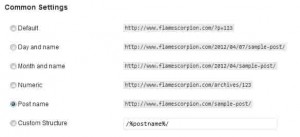
By default wordpress link structure is set to show an ugly url. Something like yoursite.com/?p=3 . WordPress have options to do this in whatever way you like, but this is the default when it installed for the first time because some hosts are not very well with url rewrite so in 3% of the cases it won’t work. To set the permalink structure go to Settings -> Perlmalinks and select the option that fits best for you. In my opinion the best way for the links is to show only the name.
You may be tempted to show the year and the month in the url. It is a blog right, it is good to know when the article has been created. This is the biggest mistake you can make at this point. Most of your content will be timeless, so showing the year in the url will be a flag for outdated content. Why to flag it as outdated when you know it is still worth a lot ? Links having the year and month are ugly, and search engines also hates them.
I think it is a big mistake because changing from year/date style to post name can be painfull. All your links are indexed and linked to in the old way so you need to take care of the whole redirects. You have to go and do some changes manually in htaccess file. You can find the code over the internet but it will be very hard for you to make the change right just from the admin panel. If you don’t add the right rules to your htaccess file your old urls won’t be accesible and you will lose a lot of visitors.
The best option is to show only the name. If you fear that at some point you will have 2 posts with the same name, then don’t worry anymore. WordPress will know this and will add an additional number to the second post with the same name. Long story short, just place /%postname%/ into the “Custom Structure” section in permalinks settings and you will be just fine.
2. Activate Akismet.
Akismet is a plugin that comes with the wordpress install files. However, it is not activated at startup, so you have to do this later. More, you have to go to wordpress.org website and register for an account to have your akismet API key. Just skip the page where they ask you to create a paid account and go with the free one.
Akismet will protect your blog from spam comments. It is very accurate and you will make your blog and your mail inbox happy. If you don’t do this, when your website get crawled by the search engines and by “do follow blog lists” then you will receive hundreds of automated comments every day, saying the same thing. Why bother to filter spam from real comments when you can let automated software to do this for you ?
3. Create a contact or about page.
If you want to start a blog or website you want to let people to see who you are and how they can contact you. The about page should contain some background on you and usually some links to social networks where you are involved. If you have a blog and people like what they read they will want to follow you and what you do, and you should not miss this opportunity.
Just writing your email address on the contact/about page is a bad thing. Spammers will use software that crawls websites for posted email addresses and what you get is only spam. Most people won’t bother to contact you unless is very important. Instead, use a contact form. I recommend to use Contact Form 7 for this. You will create a contact form on the admin panel with desired fields and then you paste a shortcode on your contact/about page. In this way you don’t get spammed and you don’t miss opportunities. A contact form is a good way to receive: collaboration opportunities, thank you messages, feedback for your website, advertising/link requests, etc.
4. Install a SEO plugin
WordPress SEO settings are ok, but you can do more. The default setup has the basic but it is not meant to maximize the output in terms of SEO. It is best to install a wordpress SEO plugin like All in one seo. What you do is to ensure that all the pages on your website have the right titles, description and keywords meta tags. This will not make your site rank on the first page instantly but it will surely help you in the long run.
When setting up the title, you should have it something like postname + blogname. I noticed that this is working best for me, despite I sometimes prefer to not have the blog name in the titles of blog posts. It looks more professional this way, but it is not that good for search engines. For example, if you want to be in the first page for a certain keyword, then you should place that keyword at the end of every page title. You have a link from every page to your homepage. Having the main keyword in every title page will just add more value for your homepage when showing search results for that specific keyword.
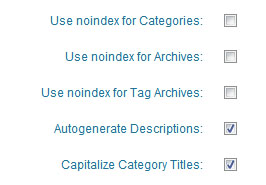
If you use All in one seo pack there are options to have no index on some pages like tag pages or category pages. Pages that will show all the post from a specific category, or pages that show all posts from a specific tag may result in search engines to index different pages on your website with similar content. Advanced SEO guys that overreact about duplicate content will tell you that you should definitely make those pages noindex, to tell search engines to not index tag or category pages. It makes sense but this also have downsides. It will hurt to your internal linkbuilding since you blog posts will not be very well linked to other posts with similar content. For example, if you write two blog posts for the same tag, they will be interlinked trough that tag page, making the connection stronger and yelling to the search engines that those posts are related and relevant one to each other. Secondly, is you use noindex or nofollow a lot on your blog Google will know that you overuse these to influence search results and you migh get sandboxed or penalised. The best way to overcome the duplicate issue is to use the more tag. Placing the “more” tag when you write a blog post will tell wordpress to show the full content only on the single post page. On all other pages like homepage, tag pages and category pages it will show only the content before the more tag.
5. Add RSS button and Email subscription
You will invest a lot in writing quality content. Whenever someone reads a post from you that he likes he will want to read more from you, but it will not waste a lot of time to remember your url or to check every day if you’ve posted anything new. He will want to connect to your content in a way or another.
The best way to let others know when you post and read your articles is your blog feed. You can locate it ad yourblog.com/feed or yourblog.com/rss. WordPress output your blog content in xml format by default. Using your content feed people can add your blog into their favourite feed reader or to receive your content by email.
Content readers are a common way to read online content. If you don’t do it already you should try Google Reader. To make it easier for others to add you, place a nice rss button somewhere at the top right of your blog. You should add the basic rss image and link it to your blog feed.
A good advice I can give you here is to use Feedburner. It is a service that will redirect your feed and will make it easier for people to add it. Also, if you use feedburner users can subscribe to receive updates on their email inbox whenever you post something new.
6. Create a Facebook fan page and a twitter account and link them from your blog
Another great way to keep your readers connected is to have a twitter account or a facebook page. Whenever you post new content to your blog, make sure you let your tweeter followers and facebook fans about it. If it is your only blog and something that represent you then you should use your personal twitter account for this. On the other side, you still need to create a facebook fan page. You don’t want to receive a friend request whenever a user want to read more from you. People can become fans of your facebook page and you can notify them whenever you post something new. The facebook page can be user in other ways too but you should learn it while practicing.
Don’t forget to add a nice follow button for twitter, and become a fan button for facebook. You can also add a nice widget that will link your facebook page with your blog.
7. Add social media and bookmarking buttons
If you write quality content or post interesting images, people will like to share it with their friends. The changes that they will tweet or share your content are higher if they can do it right away. At the top or end of every post you should have some buttons that will let people share your content on top social media or social bookmarking sites like: twitter, facebook, digg, stumbleupon, pinterest.
On wordpress you can quickly to this by installing a social sharing plugin like share this, or sexy bookmarks or whatever you see fit.
8. Add lightbox plugin for your images
By default, when you add an image into a post on wordpress, the image will have a link on it that will direct users to the full sized image. This is good but not perfect. When someone click on an image, the image will open on the same window and he will have to hit back and reload the page to continue reading. I hate when this happens. In 2012, all blogs should have a good lightbox plugin. You only have to install it ( try lightbox 2 ) and you’re all set. Whenever someone will click on an image on your content a nice javascript pop-up will show that will represent the full-sized image. The image can be closed by pressing the close button on the lightbox or clicking outside the image.
It is called lightbox because the image will show and the rest of the content will be darken to make it look that there is a light pointing to that image.
9. Add some widgets to your sidebar.
Today, almost every right coded theme will have a widgetized sidebar. This means that you can customize what you show on the sidebar directly from the Administration panel. Go to Appearance -> Widgets. On the left you will see a list of widgets you can add to your sidebars. On the right you will see the active sidebars on your theme. It is called generic a “sidebar” but actually it can be added anywhere in your theme ( header, footer, etc ).
Drag widgets that you will like to display, for example: Calendar, Archives, Recent posts, Pages to show your menu, etc.
10. Write and post some great stuff.
If you do not post quality and original stuff then you will probably fail very soon. Why will someone revisit your website, click on that ads, buy advertising or buy something that you recommend if you only post content copied from other sites or crappy articles ? Think about it and try to add value to the topic that you write about. Remember that unless you are a pop or movie star no one cares what you ate at dinner or what movies you saw ( unless you run a movie review blog ).
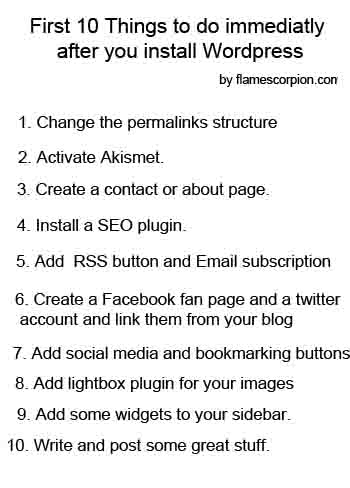
This being said, good luck with your new blog. Below it is an image that contains a list with all the above steps that you can save on your computer for later use.
Disclosure: Some of the links in this post are "affiliate links." This means if you click on the link and purchase the item, I will receive an affiliate commission


April 8th, 2012 at 9:02 am
Loved the article. A great starting point. Just the lightbox plugin was not installed on my blog rest all done. thanks for this information…wish i had read this when i started blogging. At that time it was all hit and trial and eventually got there. but would have been easier if had this in hand
thanks
munish
April 26th, 2012 at 6:20 pm
You are more on less on the money, except for the thing about Akismet. Akismet is garbage, it likes to block just as many legitimate comments as it does spam comments.
Just use GASP or something.
April 26th, 2012 at 8:23 pm
I will disagree with you. When I first used Akismet I was worried and I was checking spam comments every day. In months of doing this I found only 1 post that I had some doubts that it was spam. Probably akismet thought it is spam because it was send from an automated device or an IP used by spammers, but I deleted it anyway because it was not worth to respond.
I still receive some spam mails in my inbox but I can live with it. I can guess that you are a developer or promoter of Gasp. If it is the case, please give me more info so I can schedule to make a review of it on my blog.
April 29th, 2012 at 3:35 pm
Great article, I missed the lightbox plugin, so I’m installing that right now. Thank you.